Codex CLI 第三方 API 配置备忘
Codex CLI 是 OpenAI 官方推出的终端 AI Agent 工具,支持代码生成、文件操作等。本文记录如何配置第三方 api。
1. 安装
 1
 2
 3
 4
 5
 6
 7
 8
 9
10
11
12
13
14
15
16
17
18
19
20
21
|
# 1. 依赖 Node.js 安装 下面使用 nvm 安装 nodejs
curl -o- https://raw.githubusercontent.com/nvm-sh/nvm/master/install.sh | bash # 如果没有nvm
# 激活nvm
echo '
export NVM_DIR="$HOME/.nvm"
[ -s "$NVM_DIR/nvm.sh" ] && \. "$NVM_DIR/nvm.sh"' >> ~/.zshrc
export NVM_DIR="$HOME/.nvm"
[ -s "$NVM_DIR/nvm.sh" ] && \. "$NVM_DIR/nvm.sh"
[ -s "$NVM_DIR/bash_completion" ] && \. "$NVM_DIR/bash_completion"
source ~/.zshrc
nvm --version # 验证nvm
export NVM_NODEJS_ORG_MIRROR=https://npmmirror.com/mirrors/node # 设置镜像源
# 如果nodejs版本过低,可以使用nvm安装最新版本的nodejs
nvm install 20 # 安装nodejs 20版本

# 2. 使用 npm 安装
npm install -g @openai/codex

# 验证安装
codex --version
# codex-cli 0.117.0 # 输出版本 安装成功
|
2. cc-switch 配置第三方 API
2.1 安装 cc-switch
 1
 2
 3
 4
 5
 6
 7
 8
 9
10
11
12
13
14
15
16
17
|
# 1. 创建临时目录并下载最新版
$downloadUrl = "https://github.com/SaladDay/cc-switch-cli/releases/latest/download/cc-switch-cli-windows-x64.zip"
$zipPath = "$env:TEMP\cc-switch-cli.zip"
$extractPath = "$env:TEMP\cc-switch-extract"
Invoke-WebRequest -Uri $downloadUrl -OutFile $zipPath

# 2. 解压
Expand-Archive -Path $zipPath -DestinationPath $extractPath -Force

# 3. 移动到用户 PATH 目录(无需管理员权限)
$binPath = "$env:LOCALAPPDATA\Microsoft\WindowsApps"
if (!(Test-Path $binPath)) { New-Item -ItemType Directory -Path $binPath -Force }
Copy-Item "$extractPath\cc-switch.exe" -Destination $binPath -Force

# 4. 验证安装
cc-switch --version
# cc-switch 5.2.1 # 输出版本 安装成功
|
 1
 2
 3
 4
 5
 6
 7
 8
 9
10
|
# 1. 直接脚本安装方式
curl -fsSL https://github.com/SaladDay/cc-switch-cli/releases/latest/download/install.sh | bash

# 2. 下载解压方式
curl -LO https://github.com/SaladDay/cc-switch-cli/releases/download/v4.5.0/cc-switch-cli-v4.5.0-linux-x64-musl.tar.gz

tar -xzf cc-switch-cli-*.tar.gz # 解压
rm cc-switch-cli-*.tar.gz # 删除压缩包
chmod +x cc-switch # 执行权限
sudo mv cc-switch /usr/local/bin/ # 放到系统路径
|
2.2 设置 API Key
参考文档 (有中文版),输入对应的模型提供商、URL、模型 ID、接口令牌等信息。部分自己搭建的第三方api的base_url需要加/v1,不然请求可能会自动路由到/login的返回界面
 1
 2
 3
 4
 5
 6
 7
 8
 9
10
11
12
13
14
15
16
17
18
19
20
21
22
23
24
25
26
27
28
29
30
31
32
33
34
35
36
37
38
39
40
|
➜  cc-switch --app codex provider add # 添加新供应商 这里需指定app为codex
Add New Provider
==================================================
> Select provider type: Add Third-Party Provider
> Provider Name: example
> Website URL (opt.):
Generated ID: example

Configure Codex Provider:
> OpenAI API Key: sk-abababababababababababababab
> Base URL: http://example.com/v1 # 注意这里部分自建站点需要加/v1 同时注意这里的协议
> Model: gpt-5.3-codex
> Configure optional fields (notes,  sort index)? No

=== Provider Configuration Summary ===
ID: example
Provider Name:: example

Core Configuration:
  API Key: sk-b...ecdf
  Config (TOML): 10 lines
======================
>
Confirm create this provider? Yes

✓ Successfully added provider 'example'

# 再查看就有了
➜  cc-switch provider list --app codex # 同样指定codex
┌───┬──────────┬──────────┬────────────────────────────────────┐
│   ┆ ID       ┆ Name     ┆ API URL                            │
╞═══╪══════════╪══════════╪════════════════════════════════════╡
│ ✓ ┆ example  ┆ example  ┆ http://example.com/v1              │
└───┴──────────┴──────────┴────────────────────────────────────┘

ℹ Application: codex
→ Current: example # 当前使用的 example

# 在打开 codex 就可以使用了
➜ codex
|
2.3 配置 Skill
Skill 包含如下结构,可以理解为高级提示词。参考tutorial: 官方文档、中文tutorial
1
2
3
4
5
|
skill-name/
├── SKILL.md          # Required: Skill instructions and metadata
├── scripts/          # Optional: Helper scripts
├── templates/        # Optional: Document templates
└── resources/        # Optional: Reference files
|
可以在开源仓库/社区获取 Skills,如:
把下载好的 Skill 放到 Codex CLI 的 skills 目录就可以在 Codex CLI 中通过/skills命令启用:
下面以 matplotlib 为例,右边有 install 命令:
1
|
➜ npx skills add https://github.com/davila7/claude-code-templates --skill matplotlib
|
安装完成后可以导入cc-switch中统一管理:
 1
 2
 3
 4
 5
 6
 7
 8
 9
10
11
12
13
14
15
16
17
18
19
20
21
22
23
24
25
26
27
28
29
30
31
32
33
34
35
36
37
38
39
|
# 扫描未管理的技能
➜ cc-switch skills scan-unmanaged  --app codex
┌─────────────┬──────────┬─────────────┐
│ Directory   ┆ Found In ┆ Name        │
╞═════════════╪══════════╪═════════════╡
│ find-skills ┆ agents   ┆ find-skills │
├╌╌╌╌╌╌╌╌╌╌╌╌╌┼╌╌╌╌╌╌╌╌╌╌┼╌╌╌╌╌╌╌╌╌╌╌╌╌┤
│ matplotlib  ┆ agents   ┆ matplotlib  │
└─────────────┴──────────┴─────────────┘

# 导入到cc-switch中统一管理
➜ cc-switch skills import-from-apps find-skills
✓ Imported 1 skill(s) into SSOT
➜ cc-switch skills import-from-apps matplotlib
✓ Imported 1 skill(s) into SSOT

# 查看已导入的技能
➜ cc-switch skills list
┌─────────────┬─────────────┬────────┬───────┬────────┬──────────┐
│ Directory   ┆ Name        ┆ Claude ┆ Codex ┆ Gemini ┆ OpenCode │
╞═════════════╪═════════════╪════════╪═══════╪════════╪══════════╡
│ find-skills ┆ find-skills ┆        ┆       ┆        ┆          │
├╌╌╌╌╌╌╌╌╌╌╌╌╌┼╌╌╌╌╌╌╌╌╌╌╌╌╌┼╌╌╌╌╌╌╌╌┼╌╌╌╌╌╌╌┼╌╌╌╌╌╌╌╌┼╌╌╌╌╌╌╌╌╌╌┤
│ matplotlib  ┆ matplotlib  ┆        ┆       ┆        ┆          │
└─────────────┴─────────────┴────────┴───────┴────────┴──────────┘

# 通过cc-switch启用技能
➜ cc-switch skills enable matplotlib --app codex
✓ Enabled 'matplotlib' for codex
➜ cc-switch skills enable find-skills --app codex
✓ Enabled 'find-skills' for codex
➜ cc-switch skills list
┌─────────────┬─────────────┬────────┬───────┬────────┬──────────┐
│ Directory   ┆ Name        ┆ Claude ┆ Codex ┆ Gemini ┆ OpenCode │
╞═════════════╪═════════════╪════════╪═══════╪════════╪══════════╡
│ find-skills ┆ find-skills ┆        ┆ ✓     ┆        ┆          │
├╌╌╌╌╌╌╌╌╌╌╌╌╌┼╌╌╌╌╌╌╌╌╌╌╌╌╌┼╌╌╌╌╌╌╌╌┼╌╌╌╌╌╌╌┼╌╌╌╌╌╌╌╌┼╌╌╌╌╌╌╌╌╌╌┤
│ matplotlib  ┆ matplotlib  ┆        ┆ ✓     ┆        ┆          │
└─────────────┴─────────────┴────────┴───────┴────────┴──────────┘
|
3 Codex 使用
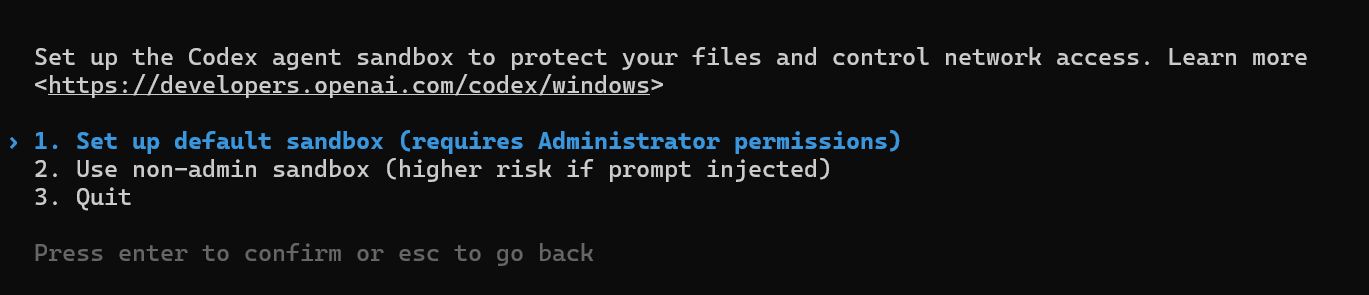
第一次启动需要选择运行模式,建议使用沙盒模式Set up default sandbox,隔离环境更安全。
3.1 基本使用
1
2
3
4
5
6
7
8
9
10
11
|
# 启动交互模式
codex
# 指定模型
codex --model gpt-4o
# 执行单条命令
codex "创建一个 Python 脚本读取 JSON 文件"
# 非交互模式(自动执行)
codex --full-auto "帮我重构这个函数"
|
3.2 常用命令
1
2
3
4
5
6
7
8
|
/resume # 恢复上次会话
/ps # 查看后台terminal
/stop # 停止后台terminal
/approvals # 授权
/skills # 管理技能
/models # 切换模型 这里可以调整思考模式 例如high extrahigh
/statusline # 状态底栏的显示 空格选中 enter保存 esc取消
# `Alt + V` windows 图片粘贴到 Codex CLI
|
4. rtk
rtk 在命令输出进入上下文窗口之前对其进行压缩。 更好的推理。更长的会话。更低的成本。
4.1 Linux
rtk 的 shell hook 能自动把常见命令重写成 rtk ...,并根据结果压缩上下文。
1
2
3
4
5
6
7
8
9
|
# 快速安装
curl -fsSL https://raw.githubusercontent.com/rtk-ai/rtk/refs/heads/master/install.sh | sh
# 初始化 Codex
rtk init -g --codex
# 重启 codex 后测试
rtk --version
rtk gain
|
4.2 Windows 原生 PowerShell
Windows 原生也能用 rtk,需要下载解压预编译包rtk-x86_64-pc-windows-msvc.zip,
- 对 Codex 的集成方式是
rtk init -g --codex
- Codex 这一项的官方集成方式是
AGENTS.md + RTK.md instructions
也就是说,对 Codex 而言,核心是给 Codex 注入使用 rtk 的规则,而不是依赖 bash hook。
安装步骤:
 1
 2
 3
 4
 5
 6
 7
 8
 9
10
11
12
13
14
|
# 1. 下载 release 里的 Windows 压缩包
# https://github.com/rtk-ai/rtk/releases
# 2. 解压后把 rtk.exe 放进 PATH
# 例如:C:\Users\xxx\.local\bin
# 3. 验证
rtk --version
# 4. 初始化 Codex
rtk init -g --codex
# 5. 重启 Codex 后查看统计
rtk gain
|
4.3 常用命令
1
2
3
4
5
6
7
8
|
# rtk 包装命令
rtk git status
rtk git diff
rtk find . -n '*.md'
rtk grep 'pattern' .
rtk read README.md
# 查看rtk压缩收益
rtk gain
|
更多命令与支持矩阵见:rtk仓库
5. 避免命令污染
5.1 Linux(zsh)
codex 执行命令也会记录在 zsh 历史中,污染平时使用的shell命令。Linux 下可以把 codex 执行的命令单独写到隔离的 HISTFILE,再按需清理旧历史, 整理脚本如下:
1
2
3
4
5
6
|
git clone https://github.com/huluhuluu/useful-sh.git
./sh/codex-zsh-history-isolation/codex-zsh-history-isolation.sh # 设置修改codex命令隔离

# 可选 清理部分历史命令
./sh/zsh-history-prune/zsh-history-prune.sh
./sh/zsh-history-prune/zsh-history-prune.sh --apply
|
原理:
- 修改
~/.codex/config.toml
- 把 shell 历史写到独立
HISTFILE
- 创建最小化
ZDOTDIR
- 控制 Codex 自己的
[history].persistence
参考链接